...

Monday, February 16, 2015

Wig Review

Long black wig review
by Kelly Leem

photo 1.JPG

Ever since I cut my hair to donate it (again), I’ve regretted doing it (again). As a result, I really miss how long hair used to look on me. So, I decided to purchase a good quality wig from ebay from a seller named cdmnwx (if you were wondering). I got it about 2 weeks later in the estimated date time and I was so excited to open it!


Packaging: *****
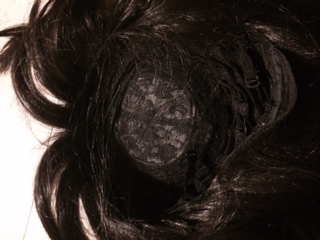
-It was in a hairnet to prevent the hairs from going all over the place, a free wig cap was provided, and the packaging was pretty secure.

photo 3.JPG
photo 5.JPG
Quality: ****
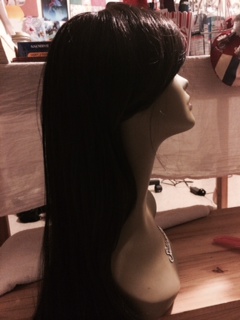
-The hair didn’t look too shiny and artificial. It actually looked pretty natural in outside and inside lighting. The hair was soft to the touch and when brushing it out, not a lot of hair was pulled out; which means the hairs are secure in the wig cap. It does become tangled, so you need to make sure that you brush it thoroughly. The wig itself doesn’t really shed (few hairs have fallen out) but since it isn’t real hair, it does become staticy when you brush it with a regular hair brush. You can wet it down a bit just to get rid of it, as well as using dryer sheets. Don’t forget to use a steel comb which you can also get on ebay for really really cheap (.89 cents).

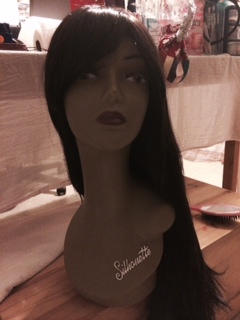
It isn’t too thin, or too thick. It has enough hair to cover my entire head and it fits my head perfectly! You can adjust it to your head size if you’d like, but I didn’t have too. You have the option to choose your color, and I chose black because it seemed like a more natural color  (though it looks like a dark dark brown under indoor lighting)

Price: ****
-I don’t really like spending a lot of money. Since this was the first wig that’s ever worked out pretty well for me, the $36.69 is worth it. Just remember, in most cases, cheaper prices mean cheaper made wigs that don’t work well (I know from experience). Keep in mind, long haired wigs usually cost more than shorter wigs

photo 4.JPG


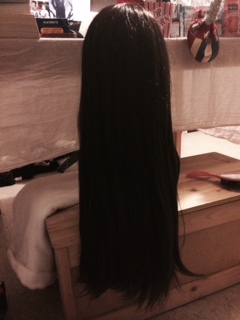
Note: Since this is a long wig, it’s a little harder to handle because of all the hair, but you can tie the wig into different styles as you would with your real hair :)


Wig name:
Long natural straight red brown heat resistant women lady girl full wig wigs

Monday, February 9, 2015

#20 Beautiful Women Challenge

Photos from the #20beautifulwomenschallenge tag

Beautiful Women everywhere
by Yura Shin
The #20beautiful women challenge is a trending instagram hashtag. It has become extremely big and now trending all over the world. 

The #20beautiful women challenge is when a women posts a photo of themselves showing their followers how beautiful they are and tags 20 more beautiful women to do the challenge. As more and more people are getting tagged, more and more people are tagging other people. As the challenge spread amongst many women, it is a symbolic 
hashtag explaining that we are all beautiful. 

Take a photo today, and post it on Instagram with the hashtag #20 beautiful even if you were or weren’t tagged because you are still beautiful.
Photos from the #20beautifulwomenschallenge tag

“It’s a way of telling other people that they’re beautiful and a way of letting else know that they are beautiful too,” senior Rachel Yacono said.


“That hashtag represents showing people that they are beautiful on the inside and out. It’s about lifting other people up and supporting empowerment for women. Instead of always being upset and fighting with one another, we can support each other instead,” senior Kaitlyn McKenna said.

“I feel that with this Challenge and nominating other people, make other people feel beautiful even if it’s just a selfie,” senior Tina Maria Kouridakis said.

Thursday, February 5, 2015

Alex and Ani

Making a Statement with Arm Candy
by Yura shin
Photo by Danielle from her Instagram account.


Alex and Ani bracelets have become a fashion statement. They are extremely popular and have definitely become a trend setter for this year. Carolyn Rafaelian is the founder, creative Director, and the CEO of Alex and Ani and makes all of Alex and Ani products “infused with positive energy” bringing good luck to whom may wear the jewelry.


“I love Alex and Ani bracelets because they match everything I wear and I can layer the bracelet with other jewelry. I love the fact that they’re so small and dainty but makes such a simple outfit vibrant,” senior Ysbel Hernandez said.


Alex and Ani  bangle bracelets are worn as charm bracelets. People stack numerous bracelets onto their arm as arm candy making it seem like a chunk of bracelets. Each bracelet has a little charm like a money, flower, and heart making each individual bracelet have a meaning to it.

Get your bracelet today from Alex and Ani’s website. They range from about $20-$40 depending on the design and type of metal.

Sunday, February 1, 2015

Negative Space Colorblock Nail Tutorial

Negative Space Colorblock
by Essence Bryant, literary editor

DSC_0138.JPGColorblock is a rising trend, both on the runway and in the nail salon. Couple this with a new trend, called negative space (where there is space on your nail that contains your natural nail color) for an amazing design. In order to get this look, you won’t have to venture out of the comfort of your home, as this design can be easily done by anyone with a few simple steps!

What you’ll need:
- clear tape (if necessary)
- a nail polish without glitter or shimmer
- a glitter nail polish
- a base coat
- a top coat

Step 1:
DSC_0139.JPGStart by applying the base coat to all of your nails. If you need to, file or buff your nails appropriately.
The base coat is used to protect your nails from yellowing and will even out any blemishes such as ridges or streaking. I am using Sally Hansens Thicken Up! nail strengthener formula. This can be purchased for $8.95 or less on Amazon
For this design, the base coat will enhance the color of your natural nail, for the negative space look.


Step 2:
DSC_0151.JPG
Once your nails are completely dry, apply one of the two colors diagonally across your nail. If necessary, use a clear piece of tape diagonally across the bottom of your nail to help shape your color for a perfectly straight line.
Remove the tape once you have painted your nail. For the first color, I am using Keep Me on My Mistletoes by O.P.I. from Sephora. This can be bought for $8.12 on Amazon.
Do this on all 10 nails.
DSC_0153.JPG


Step 3:
Before you move on, it is crucial that your nails are dry, if you are using the tape method. Using the tape, apply another diagonal piece across the opposite side of your nail, and using the second color, paint across your nail. Be sure the triangle that is made is perfectly centered on your nail. Remove the tape when you are done. For this color, I am using Romper Room by Essie which can be bought on Ulta.com for $8.50.


Step 5:
Repeat the process for all 10 nails.
Step 6:
Add your top coat for a shine and to help protect the design. Allow 10-15 minutes to dry, and you’re done!

DSC_0152.JPG