...
Showing posts with label eyes. Show all posts

Friday, December 12, 2014

Dolly Black Contact Lense review

by Kelly Leem
photo.JPG
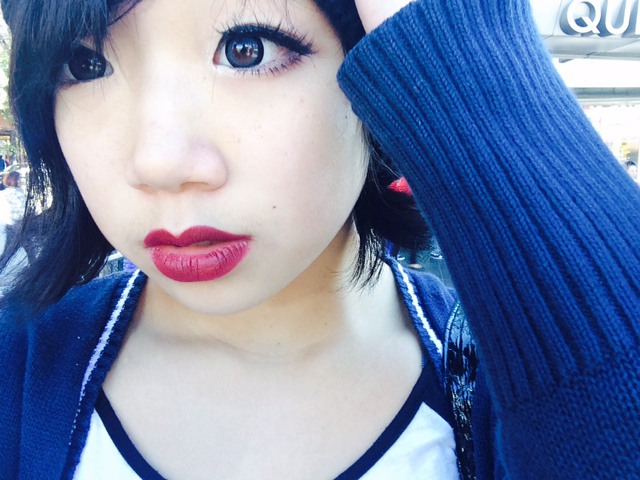
Color contacts make up a big part of makeup now a days because they can change the color of someone’s eyes without going under the knife. It visually enlarges the eye while adding a cute touch of color that can enlarge your eye and make it cuter looking (like puppy eyes). It’s used in gyaru makeup for the purpose of making their eyes look as big as doll eyes. Gyarus’ in Japan tend to use more colorful contact lenses, while the korean styled ulzzangs’ use brown and black lenses that add enlargement but are more natural looking.


~Enlargement: 5/5
~Color: 5/5
~Comfort: 4/5
~Design: 5/5
Overall: 4.5/5

~The design in the sun looks really nice! You can see how the black blends into my brown eyes, but indoors, it looks pitch black which I was going for. It’s pretty natural; no one really pointed out if I was wearing contact lenses. However, my eyes got dried out within the end of the school day. Usually it lasts the entire day, but this one kinda got dry on my eyes, so you might need some eye drops to rewet them.
photo.JPG
The difference between the eye enlargement (Left eye, with contacts: Right eye, without contacts)

Tuesday, October 28, 2014

Let’s Be A Doll

by Kelly Leem

In Japan, the Harajuku and Lolita fashion is skyrocketing! Popular models such as Tsubasa Masuwaka and Popteen Model Nana Suzuki have inspired many girls to express the Lolita Fashion Style as well as the Gyaru makeup that makes their eyes look huge like a doll.

Youtubers like VenusAngelic, Dakota Rose, and Anastasiya Shpagina, with many views has already inspired many girls worldwide including America to start wearing this type of makeup.

photo-1.JPGDoll Eyes
Products you’ll need:  
-Brown, champagne, light copper, dark brown.
~Fake Lashes (top and bottom lashes)
~Red lipstain (you can use a pigmented red lipstick) or light baby pink lipstick
~Pink shimmery blush (optional)

  1. Apply your foundation or concealer if you wish.
  2. Apply an eyeshadow primer before using your eyeshadows for long lasting wear.
  3. Apply a shimmery copper eyeshadow all over your lid and your lower lashline. This will add a tiny bit of depth
  4. Take out your false lashes and apply your top lashes and bottom lashes of your choice. Bottom lashes will emphasize the size of your eyes and so does the top lashes making your eyes look fluttery...like a doll!
  5. Take a brown shadow and apply it under your bottom lashes and blend it out.
  6. Add that same brown shadow to your crease to emphasize and make  your crease look deeper.
  7. Take a shimmery highlighting color and apply it to your inner corners! This will brighten your eyes and enlarge them.
  8. Apply a light pink shimmery blush or any blush color of your choice to make those cheeks glow.
  9. Apply a red lip stain in a gradation effect; concentrating the color in the middle of your lips and blending it out will make your lips look smaller and doll like! If you prefer a light pink lipstick, then go ahead and apply that to your lips instead.
  10. Style your hair and wear the cutest outfit you can find! Go out and be a doll!

This is a general video on how to achieve this look, but there are tons of other videos on youtube that have different styled dolly eyes that you could do! Enjoy.


Friday, October 24, 2014

DIY - Scary School Girl


by Brenda Montero

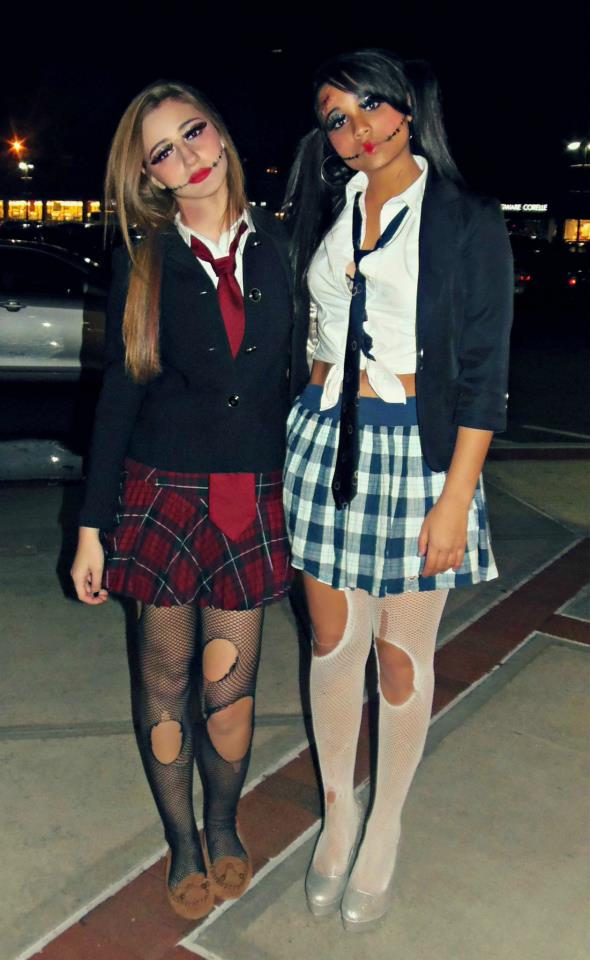
Want to be something cute and scary at the same time? Originality shows through on Halloween and this year might be the time you want to stand out with an original creation. The Scary school-girl costume can come from any idea that seems scary and flattering to you. You can practically make a design with all the items listed and still make it look different from everyone elses!

What you need for this costume:
Makeup:

How to apply your makeup:

First things first: Always start with the base for the makeup. Use foundation to cover up any marks on your face that are irregular, and concealer to cover up the dark circles. Once the base application is done begin to start with eyeshadow (whichever color is preferable), and apply it to the top of your eyes.

Then begin to use any top eyeliner, usually the liquid one works best (the one I used is ELF [$1.00] , and Kat Von D [$18.00]) and then put on the faux eyelashes. Sometimes they can turn out to be dramatically long, so its okay to give it a little trim. Next for the eyes all that is necessary is adding black or white waterline eyeliner to emphasize the eyes in a darker way and show off the color of your eyes. Lastly, use very thick mascara to thicken the faux eyelashes even more (I used Clinique [16.50]).

Once application on the eyes are finished, you can then begin working on the emphasis such as the over-exaggerated pink cheeks with blush. Then, color in your eyebrows to make them even thicker and fuller.

Finish it off by just drawing a heart shape on your lips to give it that doll effect without actually coloring your entire lips. (This is sort of related to the queen of hearts in Alice in Wonderland.)

How to apply the scars:
-Begin with deciding where exactly you want your stitches placed, In my decision I chose to put them across my cheeks connecting to my mouth to give it more of that rag doll look. To draw those I simply used eyeliner to give it a dark emphasizing look. Once that’s finished you then apply the scars to your face. I chose to put one on my forehead and my neck to spread out the look. First you begin by using liquid latex [3.99 from party city], and then using toilet paper to make it look crumpled and rotten. Once thats applied I use my same color concealer and foundation and then apply it to the fake scar to make it look like my skin is actually ripping apart. I then apply fake blood [3.99 from party city] and and draw in stitch marks again to still make it scary. (I do the same for the other scar on my neck.)

How to fix the Hair:
  • The hair can be worn various ways, I just chose to put it in pigtails to make it feel more like a school girl.


How to create the outfit:
Costume:
-Tie    -Fishnets

First begin by having an idea on what you want to wear. For this costume particularly I began by putting on the fishnets and ripping them to make them feel worn out and scary. Then put on a plaid skirt and a collared white shirt. Once the basics are on, wear a blazer or cardigan, and then the tie to make it seem like a school girl. Now the scary school girl costume is complete!

Thursday, September 25, 2014

Spook people with your halloween nails

DIY- Spooky Eye Nails
by Yura Shin

Painting spooky eyes on your nails is a perfect and simple way to participate in Halloween spirit without being too dramatic. The design only consists of two colors, making it very calm and subtle.


Materials: Black nail polish, white nail polish, top coat nail polish, dotting tool, and any plastic or cardboard to put the nail polish on.


-Paint all your nails black. Double coat your nails if needed.

-With your white nail polish, pour some out onto any plastic or cardboard. Take your dotting tool and dip it into the poured out white nail polish. Dotting tools can be purchased from any beauty supply store, or you can use the end of a needle and/or use the eraser of a number two mechanical pencil.

-With the dotting tool that is dipped in the white nail polish, make eyeballs on the upper side of each nail. Make sure to have two eyeballs for each nail and make sure to have some space in between the eyeballs. You don’t want your eyeballs to be stuck to each other. Continue this step on both hands.

-After the white is completely dried, take your black nail polish and pour some out on any plastic or cardboard. Then take a smaller dotting tool, or the same one, and dip it in the black nail polish. The black polish is going to be the pupils. With the dotting tool, dot your eyeballs. You can dot it on the inside or on the side of your eye dot. Each eye does not need to look the same. Be creative. You can have cross eyed nails or wacky eyes.

-After your nails are semi dry, apply your top coat.